Showing posts with label Steampunk. Show all posts

Monday, 3 April 2023

Time Flies


Hi there, today I would like to share the results of my latest play with the new release Lavinia stamps … another pair of ATC’s which I have called (unsurprisingly) “Time Flies”.

I love making ATC’s to use up my snippets of white stamping card, and I was able to use quite a few for these, including for the ATC base, the fussy cut clocks and even the teeny roses!


First I created a soft brick background using my new Lavinia stencil, first using Hickory Smoke and then delicately edging with Black Soot Distress Oxides. I cut the panel down into pieces 3.25 * 2.25 inches ..there were originally enough for 6 ATC’s, but four got discarded along the way!! Anyhoo .. I stamped the clock on each ATC, then stamped again on separate card and heat embossed, then coloured with a mixture of pink Distress Oxides, silver acrylic paint and pink Sakura Stardust pen.  I stamped the wings, then background stamped words and textured edges using 2nd generation stamping, and cogs using first generation stamping with one of them heat embossed in silver.  I fussy cut my separate clocks, edged with black marker pen and attached on top of the base image.  I stamped and heat embossed a selection of roses on separate card, coloured with Distress Watercolor Pencil and Spectrum Noir Sparkle pen, then fussy cut and attached.  I stamped, cut out and applied my sentiment, then spattered everything with white Posca pen.  When dry I matted onto standard sized ATC black card stock, cut from one of my last remaining snippets … I use black linen card stock a lot for matting, but it seems to have disappeared from Hobbycraft in recent months - oh no!!

Here's a close up of one of them.


Stamps: Lavinia Tock, Angel Wings Small, Cog Set 2, Cog Set 3, Steampunk Script, Texture 2, Rose Set, Time Flies;
Media: Tim Holtz Distress Oxide inks (Hickory Smoke, Black soot, Kitsch Flamingo, Picked Raspberry); Distress Watercolor Pencils Set 1 (Picked Raspberry); Versafine Clair (Nocturne, Morning Mist, Charming Pink); Versamark; clear and silver embossing powders; acrylic paint (silver); Sakura Stardust pens (pink, clear); Spectrum Noir Sparkle pen (clear); Posca pen (white);
Tools: Lavinia stencil - Red Brick.

Challenges I would like to enter:

Country View Challenges (April)Things With Wings
Crafts Galore Encore #110Anything Goes
Crafty Catz #631 - Anything Goes
Creations In Pink #56Anything Goes in Mainly Pink
Simon Says (Monday)Add Texture
(I have used Lavinia "Texture" stamp, and have the texture of heat embossing)
Simon Says (Wednesday)Anything Goes (2nd entry)
We Love 2 Create #3 2023Anything Mixed Media Goes (2nd entry)
Word Art Wednesday #589/590Anything Goes (2nd entry)

That’s all from me for today.  Take care, and thanks for visiting.
Hugs,

Tuesday, 14 March 2023

You Have My (Steampunk) Heart


Hi everyone, today is my dear husband’s birthday so I would like to share the card I made for him, using some stamps from the latest Lavinia release which I bought during my recent jaunt to the Lavinia shop. Today’s card is a bit of a mash up of inspiration from a couple of Jo Rice tutorials along with one or two of my own ideas, and a few adjustments to cater to the stash I have available. 

As soon as I saw Jo’s tutorial Steampunk Romance I knew I wanted to use the 3D heart idea for this birthday card, but as I always make him an 8” square card I opted for the large size heart rather than the small one. 


I cut a 6” square of white stamping card and created a faux wood grain background by dragging Distress Oxide ink pads across the page. Jo recommended 2 shades (Lost Shadow and Vintage Photo) but this time I added a third into the mix - Stormy Sky - which I felt really added to the driftwood vibe. I lightly stencilled over some areas with more Stormy Sky and Vintage Photo DOX and the beautiful “Divine” stencil, then stamped the heart in Twilight Versafine Clair.  As I was going to cover my base heart, I then did some more background stamping using the lovely “Background Script” stamp which has hearts in amongst the text, and a new texture stamp around the edges. I stamped a variety of cogs around the heart using various colours of VFC and 1st/2nd generation stamping to give some depth, then stamped a couple of cogs in 2 corners using Versamark and heat embossed with copper embossing powder.  I blended some Uncharted Mariner DOX around one side of the heart to add shadow and Vintage Photo DOX around the edges to add depth, and edged with gilding polish to add some sheen. I added some white Posca pen spatter then matted onto dark brown card stock  with a metallic sheen and pearlescent blue card stock, then my card base.


I made a 3D heart following the basic steps in Jo’s tutorial but with some variations in the inks used and decoration. I stamped the large heart 4 times using Twilight VFC and heat embossed - this was so that I could colour with Distress Oxide inks without covering the stamped detail.  I coloured the hearts with blended Uncharted Mariner DOX leaving them lighter towards the centre, and coloured the cog detail on each one with a Copper Sakura Stardust pen. I scored 3 of the hearts and glued them together to form “wings” then added some faux spatter using a white gel pen (real spattering would have been too messy and unpredictable), attached it to the card front then stamped the sentiment onto separate card, cut out and attached. I don’t actually own a birthday sentiment in an appropriate font for this style, so I used this AALl & Create sentiment which is a fab vintage typewriter font.


Before attaching my image panel to the card base I also decorated the inside of the card by stencilling, and stamping a small heart.  I deliberately didn’t decorate the envelope this time, as I didn’t want to give any clues as to what the card inside looked like!


I can honestly say this card took hours to make, but I’m very happy with the end result and really hope my husband will like it! I'm absolutely thrilled with the results I'm getting with the new Lavinia stamps, and think I will be using them regularly in future.

Stamps: Lavinia Heart Large, Heart Small, Cog Set 2, Cog Set 3, Background Script, Texture 2; sentiment - AALl & Create #531 Textured Florals;
Media: Tim Holtz Distress Oxide inks (Uncharted Mariner, Stormy Sky, Vintage Photo, Lost Shadow); Versafine Clair (Twilight, Pinecone, Warm Breeze, Morning Mist); Versafine (Vintage Sepia); Versamark; clear and detail copper embossing powders; Cosmic Shimmer gilding polish (Warm Copper); Sakura Stardust pen (copper); Posca pen (white);
Tools: Lavinia stencil - Divine.

Challenges I would like to enter:

Country View Challenges (March)Birthday Card For a Man - TOP 3
Happy Little Stampers: Stencils (March) - Anything Goes With a Stencil
Mix It Up #64 - Anything Goes with option Distressing
Mixed Media Lovers #23Focal Point (2nd entry) - TOP 3
Sparkles #161For Men Only - TOP 3
Word Art Wednesday #585/586Anything Goes (5th entry) - TOP 3

My husband is in work today, so yesterday I baked him a chocolate cake with chocolate orange icing to take in for his colleagues (but with strict instructions he needs to cut me a piece!!). We’re not doing anything particularly special for the “birthday boy” this evening as it is a school night, but I hope we might get out for a meal and meet some friends at the weekend. 

Take care and thanks for visiting.
Hugs,

Tuesday, 7 March 2023

Tick Tock!


Hi everyone, on Sunday I was fortunate enough to have opportunity to drive down to Ruthin to visit the Lavinia shop for one of their Clockwork Carnival Open Days. I had a fantastic time, meeting the owner Tracy and watching the fab demos by Jo Rice and Sarah Anderson where I picked up some interesting tips and tricks. Of course, last but not least I bought me some new craft stash including a good selection of stamps from the new release. They are really quite different for me, but they have made me feel really inspired and I couldn’t wait to have a play.

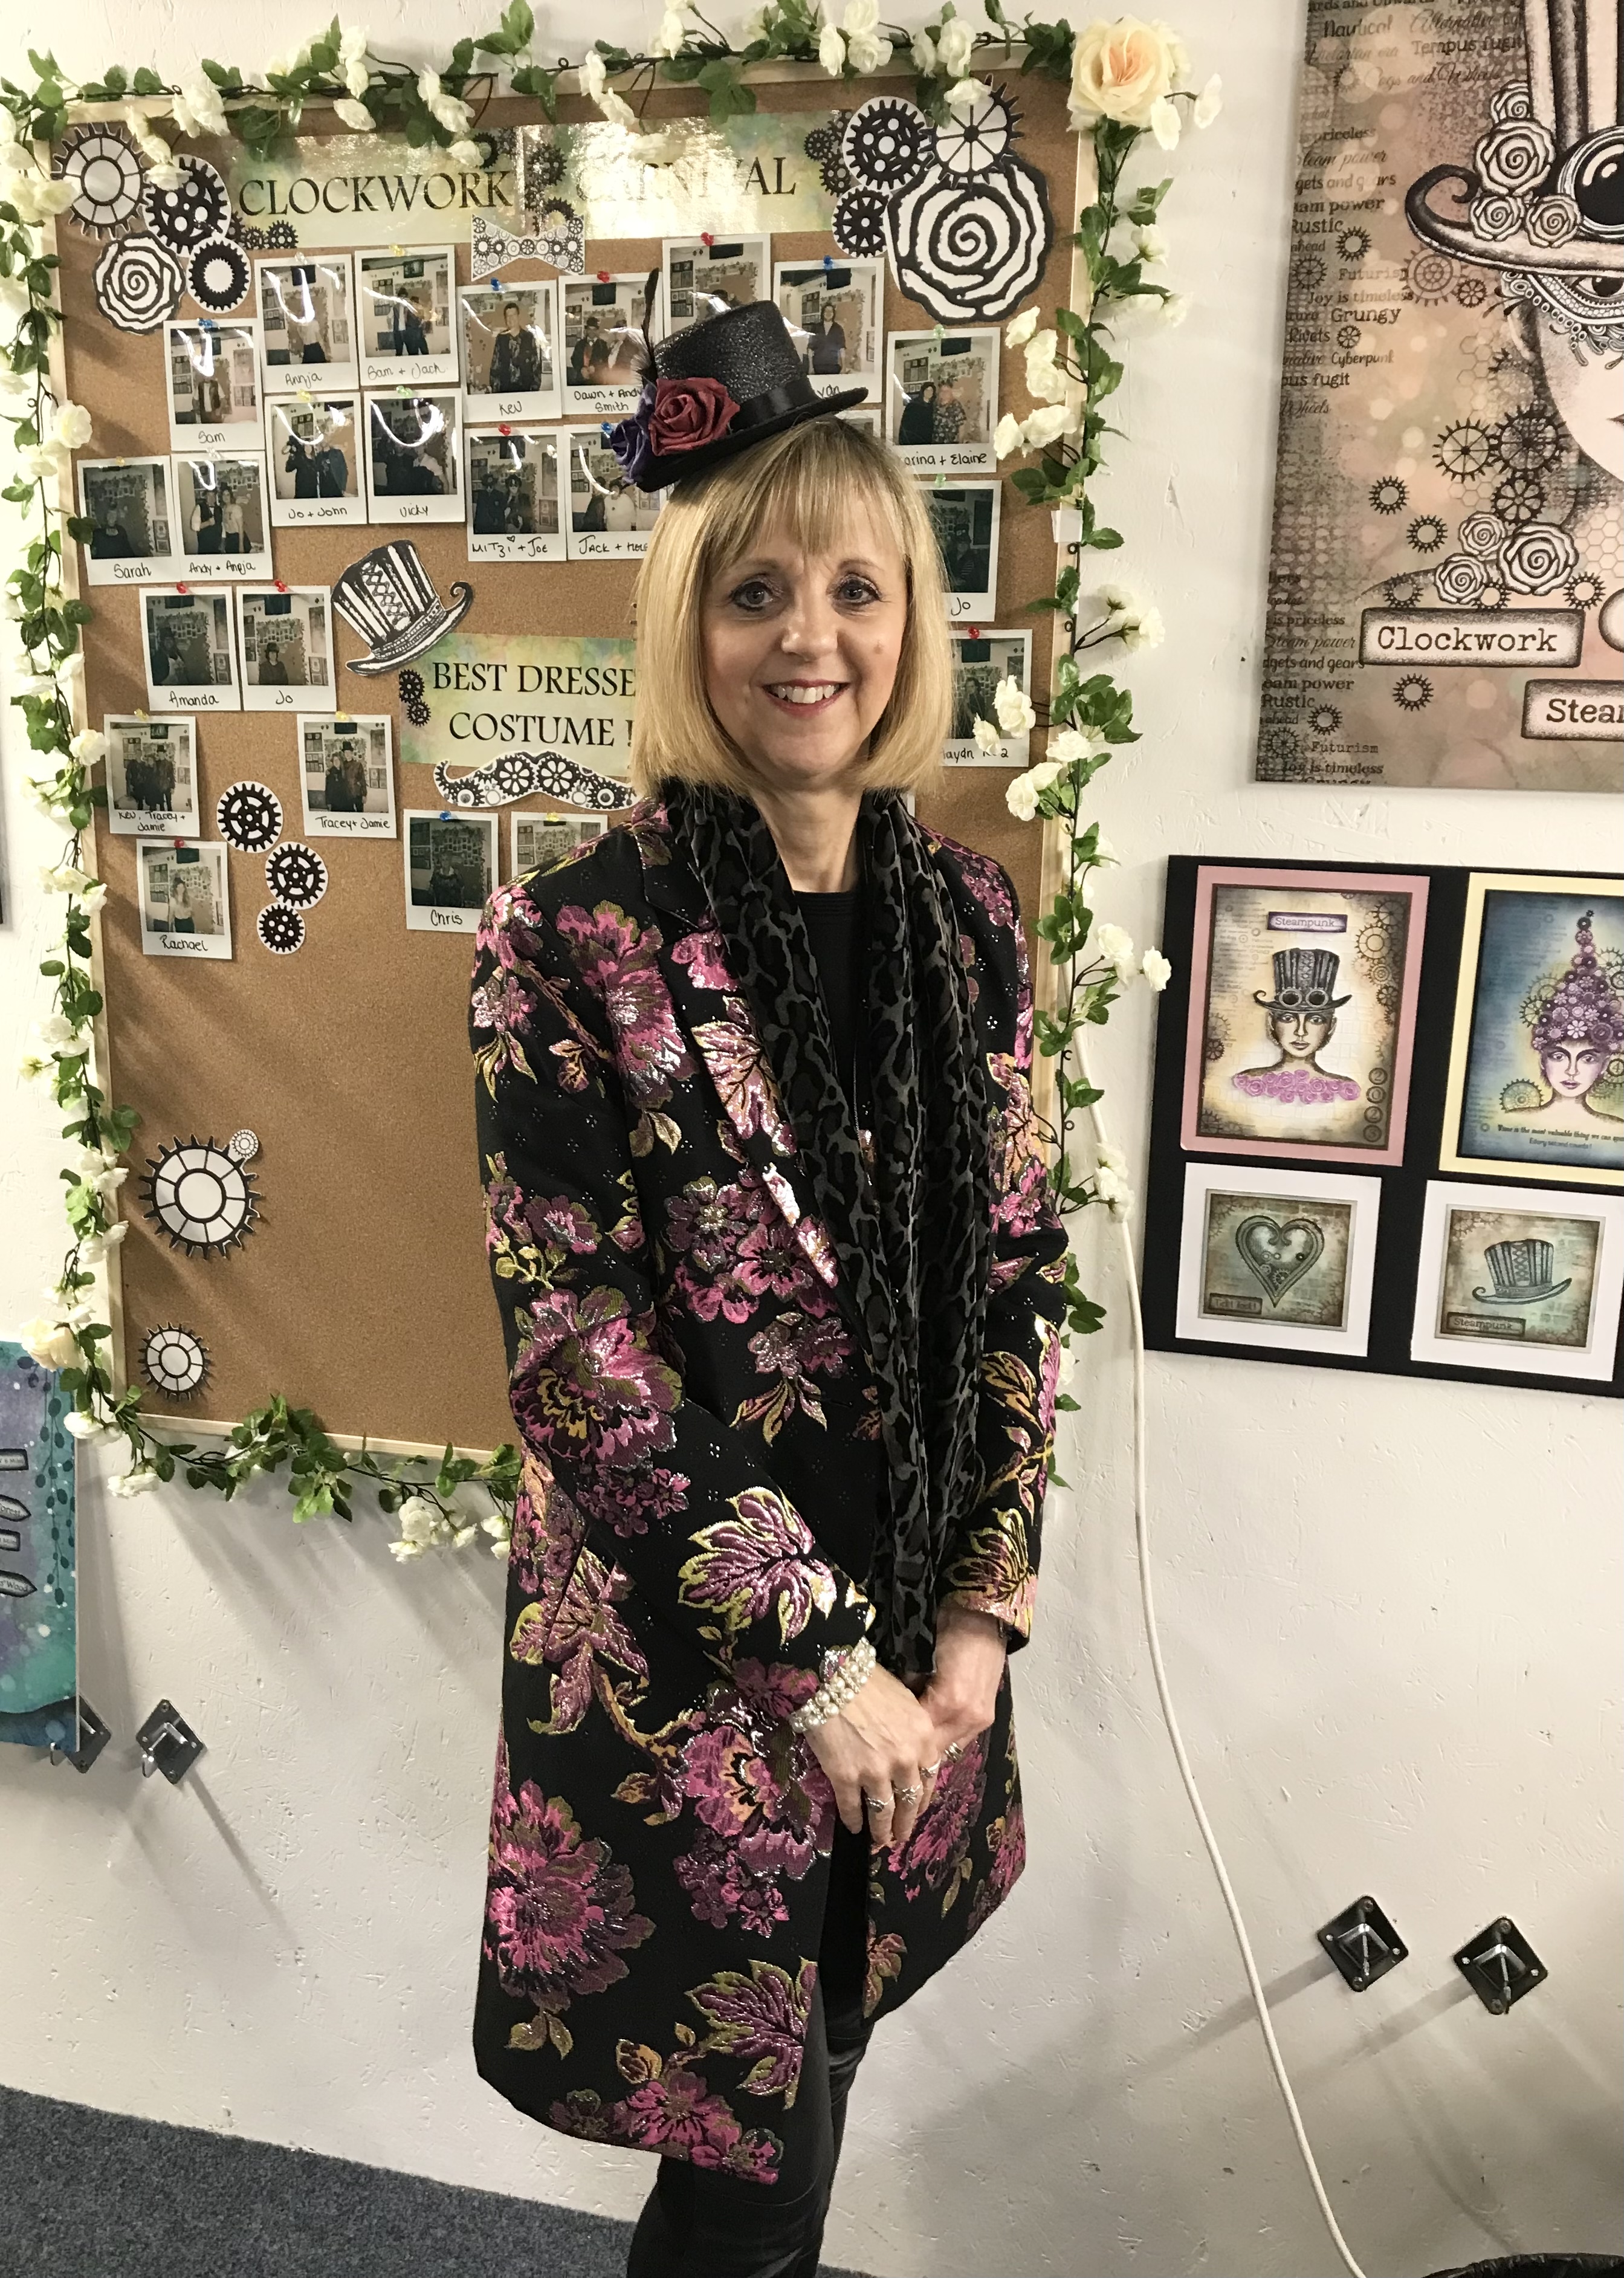
I tried to get into the spirit of the event by dressing up .. .the team had asked people to go in Steampunk or Fantasy costumes if we fancied. I didn’t put together an outfit ahead of time as I wasn’t sure if I would attend, so on the day I pulled out my rarely worn Chrimbo “frock” coat and paired it with leather leggings, chunky lace up boots and a bit of dramatic lipstick and eyeliner!!  Although not strictly fancy dress it really put me in the mood, and while I was there Noni in the team lent me her hat to have my picture taken ❤️. So here are a couple of pics …

… Me in glam coat and Steampunk hat!


… Jo Rice mid-demo (yes that really is her under the black wig!!)


… Sarah Anderson with her dinky altered tins.


It truly was a fabulous event, and I was keen to get started with my new stamps plus my first ever metallic gilding polish. So here I am with a pair of ATC’s which I have called “Tick Tock!”.


A couple of the techniques (particularly the Distress oxide "woodgrain" effect) and the colour scheme on these were inspired by a tutorial Jo did to make an altered MDF heart.

I practiced the technique of swiping two Distress Oxide ink pads across the page to give a distressed woodgrain effect, using various snippets of white stamping card. I then cut the ones I liked best to 3.25” x 2.25”. Here's a closeup pf the individual ATC's. 

ATC 1 of 2

ATC 2 of 2

On  ATC 1  I stamped the focal clock using Pinecone Versafine Clair  then masked it and stamped a second smaller clock then masked that, and added various background 1st and 2nd generation texture and word stamping in brown, orange and grey. I then stamped various cogs in the same colours plus black. I removed the masks and watercoloured the clocks using a Distress Watercolor pencil and Distress Inks, and added highlights and spatters using watered down warm copper gilding polish. I stamped my sentiment onto an offcut of the “woodgrain” card, edged with distress ink and attached, then edged the finished piece with gilding polish before matting onto a standard ATC size piece of dark brown card stock.

I wasn’t very satisfied with how the gilding polish had covered the stamping nor with my spattering, so learning from that, on ATC 2 I heat embossed my focal clock. That gave a much better end result, so I returned to ATC 1, stamped another clock onto an offcut and heat embossed that too, then coloured, spattered, fussy cut and attached. I felt that looked quite a bit better, so I’m happy with my learning from this project and can’t wait to make more ATC’s along similar lines.

Here is an angled pic to show the sheen on the gilding polish - I absolutely love it!


Stamps: Lavinia Tick, Tock, Clock Set, Texture 1, Texture 2, Steampunk Script, Cog Set 2, Cog Set 3, Time Flies;
Media: Tim Holtz Distress Oxide inks (List Shadow, Frayed Burlap, Vintage Photo); Distress Inks (Walnut Stain, Vintage Photo); Distress Watercolor Pencil (Rusty Hinge); Versafine Clair (Pinecone, Morning Mist, Summertime, Nocturne); Cosmic Shimmer Gilding Polish (Warm Copper).

Challenges I would like to enter:

Corrosive #3 2023 - Anything Goes
C.R.A.F.T. #669 - Not a Card
Mixed Media Lovers #23 - Anything Mixed Media With a Focal Point (ATC 2 of 2) - TOP 3
NBUS #48Use Your Never Before Used Schtuff
( mine is all the stamps, Vintage Photo DOX  and gilding polish)
Stamping Sensations (March)Anything Stamped (ATC 1 of 2)
We Love to Create #2 - Anything Mixed Media Goes
Word Art Wednesday #585/586 - Anything Goes (3rd entry)

So Carnival Time is over, but I think I'll be using these lovely stamps a lot more in future ... I love my flowers, trees and fairies but as they say a change is as good as a rest!!

Take care and thanks for looking in today.
Hugs,